DaVinci Resolve 12: New timeline navigation option in the Color page
What’s one of the fun things when working in a brand new, completely updated version of the software you use professionally? Why, discovering all the little features that didn’t make it into the marketing material! That’s what this little series is about. As I discover nifty stuff about Resolve 12, I’ll point them out right here in this Little Gems series.
Imagine you’re working on a 300-shot timeline with a ‘letterbox mask’ on the top-most tracks
What do I mean by that? Notice in this next screenshot how I’ve got two long clips on Tracks V3 & V4… they’re the same full frame black .jpg, cropped to create a letterbox.
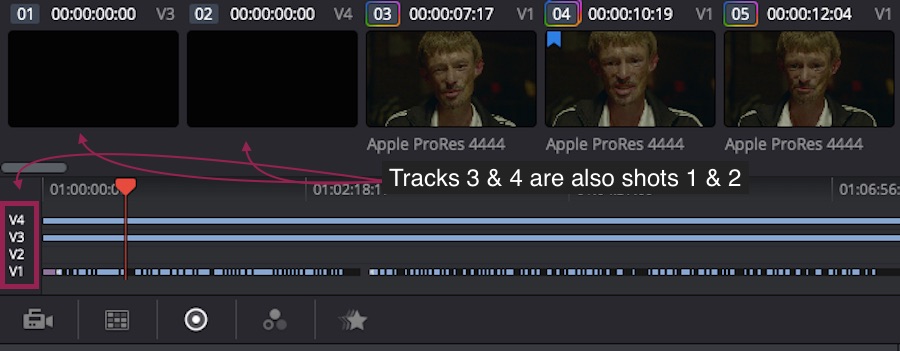
Notice how all four tracks are active. Also notice Shots 1 and 2 are the full-frame black overlays for letterboxing.
Also notice how the black JPEGs are also shots 1 & 2 in our thumbnail timeline. Why have we used these JPEGs instead of Resolve’s built-in letterboxing tools?
There are a few flashback sequences where the Letterbox is supposed to disappear and the image goes full screen
This makes masking with Resolve’s built-in toolset a little tricky and using top-level tracks just for letterboxing makes a ton of sense. But there’s a problem and it was posted on Blackmagic’s DaVinci Resolve forum a few days after the launch of DaVinci Resolve 12 Public Beta 1.
Here’s the unexpected problem that the Original Poster found when navigating the timeline with top track letterboxing while color grading:
The trouble is, when I’m grading the clips on track V1, and I pause playback, the clip on V5 gets selected, so then the up and down arrow keys cause the playhead to jump far away from where I was working.
If you’ve color graded more than a handful of jobs on DaVinci Resolve, you know precisely what Elliott is experiencing. Basically… every time he pauses playback, Resolve re-selects those top-level shots as the active shots. If he up- or down- arrows, he jumps to the first or last frame of those shots.
In a 30 minute sequence, that’s a major annoyance.
Before DaVinci Resolve 12, the only way to solve this navigation problem was to turn those top-level tracks off, hiding the letterboxing. And if you’ve ever graded a project that was shot full frame but protected for the letterbox, you know your color grading decisions change if that letterbox is turned off vs turned on.
It’s a maddening predicament…
You need the track turned on for color grading, but you can’t navigate shot-to-shot using the keyboard without turning the track off. This gets us to…
Little Gem #2: ‘Ignore Track for Transport’
DaVinci Resolve’s Product Manager, Peter Chamberlin, chimed in with a solution that’s brand new in DaVinci Resolve 12:
There is a new feature in v12. On the color page, hold option key and select the track number on the far [Left Hand Side] of the track that you wish to be ignored for transport selection. The track number is red when in this mode.
This will hide items on this track from the thumbnails but when the CTI is over those clips you will still see their impact on the viewer.
Ideal for mattes, grain, titles, etc.
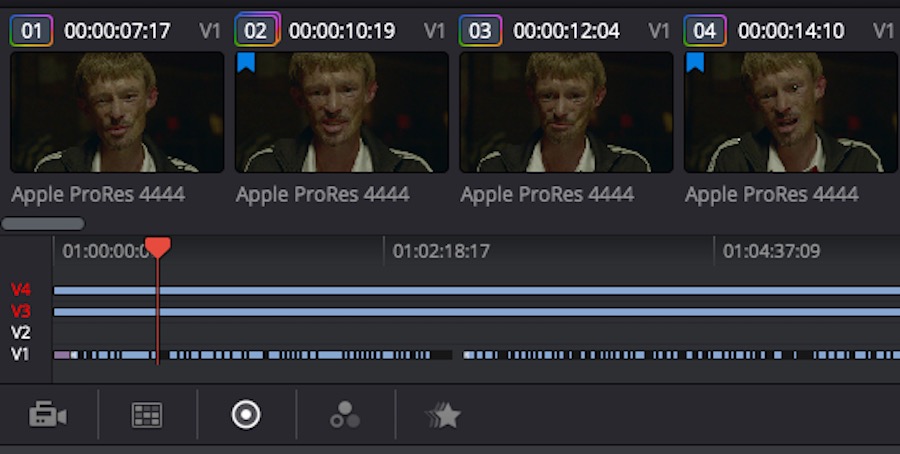
Little Gem #2: After option-clicking on Tracks 3 & 4, they turn red. The tracks are active but ignored for timeline navigation purposes while in the Color Page.
In the screenshot above, tracks 3 & 4 are active, but ignored
Notice how they’ve disappeared from the thumbnail navigation, no longer labeled as Shots 1 & 2. Now you can have overlays spanning entire timelines, keep them active for color grading decision-making and never have them get in the way of navigating the timeline on the Color page.
THAT is the definition of a power users’ Little Gem 
– pat